...has been due to there being nothing to talk about. I've stopped running Gardenia Falls since there was really no point to continuing it since I'm going to restarting the run with new blood in a completely different room anyway, and I'm not really in the mood right now to work on the Flesheaters (they're one of those "on-off" projects...that's mostly the reason why they're taking so long).
With that said, I'm still hanging around the CC and watching the recent burst of activity at CCaves and the developments occuring in the worlds at Naturing :: Nurturing, Discover Albia, and other Creatures blogs that aren't this one.
I also have a few releases planned. One of them somewhat obviously consists of the Waterfall Grendels V3 - I still need to make a few tweaks to their genome and patch up their agents (which are also getting new sprites courtesy of mea of Caos of the Creatures Realm) before I put them up.
Speaking of mea, I'm also helping her with a few of her projects as well as a collab (at least, that's what I'm calling it). The projects being worked on are mostly agents, but the collab is on something pretty major. I'm not going to say what it is, though - you'll see when it comes out.
I don't plan on editing the blog's design any further at the moment - I'm pretty happy with it as it is. I might mess with the background later if I can find a decent graphic that's under 300kb and large enough so that it doesn't repeat.

Risen Angel's Creatures blog, dedicated to the various ways the games can be played, altered, and sometimes completely broken.
Thursday, March 29, 2012

Tuesday, March 27, 2012
Gardenia Falls: Gluttons and Thugs
So I started the Wolfling Run shortly after making my last post. The tribbles being able to breed like rabbits? Didn't help them much - they were extinct in literally less than a minute (read: when only three grendels had hatched). The grasshoppers soon followed them after everyone had hatched. However unviable those two were, at least they showed that the grendels' diet was working right.
The next thing the grendels did? Being generally friendly, you'd think they would choose to play with plants or something. No, what happens instead is that half of them decide that beating the everloving crap out of the others was the most fun thing to do. The first hour of the run was filled with the sounds of noms being consumed and grendels being whacked. The slapping got to the point where I just said "Screw it" and altered the hit script to punish anyone who tried slapping another creature.
I know baby creatures are supposed to be curious, especially when they're running CFE edits, but it does not make sense that they'd decide to be sociopaths within the first few seconds of life. It's ridiculous.
After that, I decided that the grendels could make it through the night and left the game running and went to bed. When I got up in the morning, anything that could have gone extinct, did go extinct (excluding the grass and the Square Root). The only food sources left were the stuff that replenished itself (the pumperspikel seeds, the chili pepper pot, etc.). Since there was a dearth of food, the grendels were focused on trying to find it instead of breed - there were also no eggs to be had, although the general population was around Generation 2.
To rectify this, I injected a bunch of food sources that wouldn't go extinct (including one of the original Gardenia plants), plus the tubas. That fixed the lack of food sources, and got them breeding again. So I left for my morning classes. Nothing much had changed when I got back, leading to the current state of the run:
 I'm probably going to tweak the grendels' genome a bit based on current experiences - for one, they shouldn't have decided to engage in beatdowns shortly after hatching, and I also plan on reducing their hunger a bit so that they eat what's necessary and leave everything else alone.
Ultimately though, I should have just went with a different metaroom. Gardenia is a bit on the small side, meaning that it was way too easily depleted. I'll probably leave this run go on for another few days, then restart it with the updated grendels in a larger area (though I have no idea what area at the moment).
On a positive note, the pests and weeds are doing their jobs.
The next thing the grendels did? Being generally friendly, you'd think they would choose to play with plants or something. No, what happens instead is that half of them decide that beating the everloving crap out of the others was the most fun thing to do. The first hour of the run was filled with the sounds of noms being consumed and grendels being whacked. The slapping got to the point where I just said "Screw it" and altered the hit script to punish anyone who tried slapping another creature.
I know baby creatures are supposed to be curious, especially when they're running CFE edits, but it does not make sense that they'd decide to be sociopaths within the first few seconds of life. It's ridiculous.
After that, I decided that the grendels could make it through the night and left the game running and went to bed. When I got up in the morning, anything that could have gone extinct, did go extinct (excluding the grass and the Square Root). The only food sources left were the stuff that replenished itself (the pumperspikel seeds, the chili pepper pot, etc.). Since there was a dearth of food, the grendels were focused on trying to find it instead of breed - there were also no eggs to be had, although the general population was around Generation 2.
To rectify this, I injected a bunch of food sources that wouldn't go extinct (including one of the original Gardenia plants), plus the tubas. That fixed the lack of food sources, and got them breeding again. So I left for my morning classes. Nothing much had changed when I got back, leading to the current state of the run:

Ultimately though, I should have just went with a different metaroom. Gardenia is a bit on the small side, meaning that it was way too easily depleted. I'll probably leave this run go on for another few days, then restart it with the updated grendels in a larger area (though I have no idea what area at the moment).
On a positive note, the pests and weeds are doing their jobs.
Monday, March 26, 2012
Wolfling Run: Gardenia Falls
Before anything else, you might notice the blog looks a bit different. Thanks to some (read: a lot) of help from Jessica, I was able to add some HTML/CSS elements to this blog to make it look a bit nicer than it was at launch. The most noticeable changes are the transparency and the centered header image, in addition to the centered post titles. The background is also a little less grainy looking thanks to an artistic effect I applied to it in GIMP (and I still had to reduce the quality of it a bit - bloody 300kb limit).
Enough about the blog - it's time I told you about the first WR I'm documenting on this blog. This is a breed-testing run for the Waterfall Grendels V3. The world is called what it is to both note the room it's being held in plus its primary feature once I was done meddling with it.
 I ruminated on what metaroom to use for the run for a while before finally settling on Gardenia. I thought about the Biodome, but it's a bit buggy. I also considered Norngarden 1, but the lifts would need to be recoded a bit to fit grendels, there's a pond they could drown in (the baby Waterfall Grendels lack fully-functioning hydrophobia), and there was no real place to put the water. Gardenia (by zareb) fits the theme, is small enough to customize easily and rather quickly, and to top it all off there's a nice rock structure in the center to set up the waterfall. So, Gardenia it was.
However, the room needed some serious renovation before it was ready for customization. For one, its terrain by default is actually set to "Outdoor Concrete." If I wanted to use the default Gardenia life, I could have left it that way, but I didn't. So I had to change a bunch of room types. Now, the room is mostly Normal Soil, with the fallen tree over on the left being Boggy Soil and the top of the rocks remaining as Outdoor Concrete.
While I was at it, I changed the room's otherwise sloppily implemented CA system. Now, the light and heat change depending on the time of day, and there's a waterspout (invisible agent that spits out other invisible agents that produce water and nutrient CAs) in the room's center. I also tweaked the weather system a little bit (although it was mostly fine as it was). I plan on fully revamping the room's coding at a later date, but for now it's suitable for a Wolfling Run.
The list of agents that I used, organized by general, injected with the Agent Injector, and injected via the CAOs Tool:
General
Now, you're probably wondering about the Radio Box attached to the Egg Finder. That's part of the world's (Creature) Egg Management system.
 This is the rest of the system. This setup of gadgets, called the Ovicidal Agent, was initially created by Minisauron to monitor the population of his Grendels of Minimordor. The idea behind it is to have older eggs constantly destroyed, so that only the best breeders get to pass on their genes. It definitely works for that purpose, but the main reason it's implemented in this run is to keep the generations moving. If it wasn't in place, then eggs containing gen 2 grendels would be hatching when the general population was somewhere around 7. This setup, by constantly destroying older eggs, ensures that the contents of the eggs are at a similar generation to the living population.
For those of you interested in setting up one of these, I'll detail the process in a later post. Their creation is beyond the scope of this one.
Now, to introduce the grendels themselves.
 The original Waterfall Grendels are one of my personal favorites of the breeds I've made. As their name suggests, they're based on organisms that would normally be found living around a waterfall. To this end, the Waterfall Grendels enjoy cool, moist areas - hot, dry areas reduce their immunity, while cool, moist areas increase it. They also live a bit longer than most grendels (and most norns - their lifespan is comparable to the Bondi Norns). They can also hold their breath for a long time (about 5 minutes).
To be honest, I don't think the creation of the Waterfall Grendels V2 was necessary. However, I felt compelled to make them when I updated the agents included with the originals (the aforementioned Waterfall and Waterfall Mushroom). Their differences from V1 were mainly the fact that they were amphibious, scared of norns, and were more susceptible to being slapped to death. Due to the fact that I perceived them as unnecessary, I never truly liked them - to the point where I included the V1 grendels in the download.
V3 is an effort I'm very happy with (the male up there is an example of a V3 grendel). In most aspects, they're closer to V1 than to V2. In terms of features exclusive to them, the only major thing that differentiate V3 from V1 is that V3 can't last quite so long underwater, and will get scared if they start drowning (in an attempt to get them out of the water when that happens).
However, the base used for V3 is what sets them apart from the previous two. In addition to having all of the non-ForF edits of the CFE, they also have the digestive process ripped from Darcie's Gizmo Norns. That is, they can't last forever without food. An unaltered C3 grendel will last for an hour or more after hatching if left unfed. The Waterfall Grendels V3, along with all the other breeds that will share their base, last for a mere 11 minutes from hatching if they don't eat something. Given that they won't become adult for a little over an hour, they need to eat in order to breed (this does wreck their chances at the standard IQ test, though).
I'll end this post with a little bit of a cliffhanger:
 These are the eggs of the initial population. The population limit is set to 10, as that's how many I think Gardenia can support at once. I'll also say that I'm not documenting the lives of the individual grendels. I'll probably leave the run going when I'm not actively playing the game (or even at the computer), and post updates here about the trends of the general population.
Enough about the blog - it's time I told you about the first WR I'm documenting on this blog. This is a breed-testing run for the Waterfall Grendels V3. The world is called what it is to both note the room it's being held in plus its primary feature once I was done meddling with it.

However, the room needed some serious renovation before it was ready for customization. For one, its terrain by default is actually set to "Outdoor Concrete." If I wanted to use the default Gardenia life, I could have left it that way, but I didn't. So I had to change a bunch of room types. Now, the room is mostly Normal Soil, with the fallen tree over on the left being Boggy Soil and the top of the rocks remaining as Outdoor Concrete.
While I was at it, I changed the room's otherwise sloppily implemented CA system. Now, the light and heat change depending on the time of day, and there's a waterspout (invisible agent that spits out other invisible agents that produce water and nutrient CAs) in the room's center. I also tweaked the weather system a little bit (although it was mostly fine as it was). I plan on fully revamping the room's coding at a later date, but for now it's suitable for a Wolfling Run.
The list of agents that I used, organized by general, injected with the Agent Injector, and injected via the CAOs Tool:
General
- A.S.K. (Arimeides Starter Kit) Corpse Cleaner: Gets rid of dead bodies so that I don't need to scroll the camera over them to get rid of them. As I don't plan on watching this run all the time this will be extremely useful.
- Advanced Autosaver: Keeps frequent backups of the world in event of a crash.
- All-Creature Autonamer - Names all un-named creatures. This particular autonamer is one I altered myself, and has the bonus of working in C3 standalone.
- Hand Hider - So the grendels don't obsess over the hand while I'm watching them.
- Amber Stump: A very slow source of food and source of entertainment.
- Awkwood Creeper: These normally inject into the Meso, but I moved them in here courtesy of Amaikokonut's Magic Words. Food source.
- C1toDS Bad Plants: These are here to challenge the grendels. If they're stupid enough to try the weeds, then they deserve the shot of toxin they'll get.
- C1toDS Carrots: Another food source that's very good at keeping its population up.
- Chili Pepper Pot: A source of fruit, and a reason to encourage the grendels to go up to the top of the rocks (the room's small, so I decided to let them go up on top of the rocks in the event the floor becomes too crowded). Also provides flowers for the butterflies.
- Elevines: Allows the grendels to go up on top of the rock structure to avoid overcrowding on the ground floor.
- NG Eggplant. Yet another food source (and a flower for the butterflies).
- NG Eastertribble: Edible critters that breed like rabbits. Waterfall grendels love critters, so one that won't die out easily is perfect. Their eggs kinda mess with the egg management system, though.
- NG Trasherplant: A source of food, but something needs to be fed to it before it yields. Mostly in here for the atmosphere.
- TP2DS Munchroom Vendor: A food item that can be any sort of edible depending on its surroundings. One of the most useful food items there is.
- Waterfall: The thing that gives the room its name, and also gives the grendels a cool and wet place to call home.
- Waterfall Mushroom: A source of food, seeds, and possibly entertainment. Since these things leave a lot of seeds around, they're also good for feeding tribbles.
- Yummy Seeds (Square Root): A source of fruit and seeds.
- Butterflies: From the Norn Terrarium. Make the room look pretty in addition to being a food source (the Waterfall Grendels also love eating bugs).
- Grass and Grasshoppers: There's really no need for more seeds thanks to the Waterfall Mushroom, but the grass is in here to feed the Grasshoppers, who are another edible bug to keep pressure off the butterflies.
- Mossie Flies: A pest to challenge the grendels.
- Pumperspikel: Yet another source of seeds.
- Stingers: They're listed in here because, like I mentioned back in my description of my main world, they don't inject by default into my DS worlds. Another pest to give the grendels trouble.
Now, you're probably wondering about the Radio Box attached to the Egg Finder. That's part of the world's (Creature) Egg Management system.

For those of you interested in setting up one of these, I'll detail the process in a later post. Their creation is beyond the scope of this one.
Now, to introduce the grendels themselves.
The original Waterfall Grendels are one of my personal favorites of the breeds I've made. As their name suggests, they're based on organisms that would normally be found living around a waterfall. To this end, the Waterfall Grendels enjoy cool, moist areas - hot, dry areas reduce their immunity, while cool, moist areas increase it. They also live a bit longer than most grendels (and most norns - their lifespan is comparable to the Bondi Norns). They can also hold their breath for a long time (about 5 minutes).To be honest, I don't think the creation of the Waterfall Grendels V2 was necessary. However, I felt compelled to make them when I updated the agents included with the originals (the aforementioned Waterfall and Waterfall Mushroom). Their differences from V1 were mainly the fact that they were amphibious, scared of norns, and were more susceptible to being slapped to death. Due to the fact that I perceived them as unnecessary, I never truly liked them - to the point where I included the V1 grendels in the download.
V3 is an effort I'm very happy with (the male up there is an example of a V3 grendel). In most aspects, they're closer to V1 than to V2. In terms of features exclusive to them, the only major thing that differentiate V3 from V1 is that V3 can't last quite so long underwater, and will get scared if they start drowning (in an attempt to get them out of the water when that happens).
However, the base used for V3 is what sets them apart from the previous two. In addition to having all of the non-ForF edits of the CFE, they also have the digestive process ripped from Darcie's Gizmo Norns. That is, they can't last forever without food. An unaltered C3 grendel will last for an hour or more after hatching if left unfed. The Waterfall Grendels V3, along with all the other breeds that will share their base, last for a mere 11 minutes from hatching if they don't eat something. Given that they won't become adult for a little over an hour, they need to eat in order to breed (this does wreck their chances at the standard IQ test, though).
I'll end this post with a little bit of a cliffhanger:

Saturday, March 24, 2012
Project: Flesheater Grendels
 |
| An adult male Flesheater |
The Flesheater Grendels are my magnum opus - the most complex and polished breed I ever plan on making. As can be expected, I'm taking my time in making them and constantly testing them after each change I make. It's the most amount of work I've ever put into a genome, and I hope that it pays off.
The Flesheaters are designed as an answer to a particular problem about the normal grendels - as a wolfling run hazard, they're hit or miss. If you use the standard (Jungle) grendel as a hazard, they'll either do nothing or kill all your norns within a short timeframe. It's rare that you'll get grendels that actually serve the purpose as a check to the norn population.
The problem with the normal grendel is in their anger levels and aging process. Standard C3 grendels age really fast - hatch a norn and a C3 grendel at the same time and the grendel will be an adult in a fourth of the time it takes for the norn to get to that lifestage. As well, C3 grendels get angry for the most trivial things (such as running into walls). The end result? An angry, adult C3 grendel can easily end a wolfling run before any of the norns get a chance to breed. Even worse is if one decides to hatch a breeding pair - the C3 grendels will be having babies by the time the norns actually start wandering around.
Banshee grendels aren't much better. While they don't start hunting norns until adulthood, when they hit that age they're every single bit as remorseless as the standard grendel - to end an adult's killing streak, the grendel itself needs to die or all the norns need to die.
If you want an example of what I mean, read this topic about a wolfling run where the Banshee Grendels were given the aging process and breeding speed of the standard C3 grendel. It didn't end well, to say the least.
Another problem is that the standard norn really doesn't stand a chance against a grendel. In a normal world, the hand could just teach the norn to hit the grendel, but in a wolfling run a norn won't know to do that. Better yet, even if they did know that they could hit the thing, it would likely get them nowhere - normal and banshee grendels are relentless when attacking.
This problem is what the Flesheaters aim to fix. Where a normal grendel's relationship with a norn is akin to that of a serial killer's with his victims, the Flesheaters and norns have a relationship more like that between a lion and a zebra. The Flesheaters will get angry and will kill norns, but they know where to draw the line and won't kill more norns than is explicitly necessary. They also have an altered aging and breeding process to ensure that they don't get the jump on norns if they're hatched at the same time as their prey.
Flesheaters also are being designed so that the normal norn has a chance against them. Their flight-or-flight genes are edited so that a healthy grendel fights back when attacked, but grendels in high amounts of pain will turn tail and run. Basically, a norn merely has to slap a Flesheater enough to get it to run away. If the norns have access to education, they then could pass down their knowledge to the next generation, possibly ensuring the species's survival.
This is more an introduction to the breed than anything else - the breed will get covered in more detail in future posts. So for now, I'm leaving it at that. I do want to know, however - is there anyone who's actually interested in a grendel like this? My past attempts at hosting a public beta test for them ended in dismal failure. While the files I put up are getting downloads, I'm not getting any feedback on them even though I explicitly asked for it. So I'm wondering if there's an actual need for a grendel like these.
For those of you interested in testing the Flesheaters: You can get the genome and a breeding pair for v0.5 (the latest public revision) here. They're a bit outdated, but they're still a good example of what I'm aiming for.
Friday, March 23, 2012
Tutorial: Extracting Plants and Animals from a Metaroom

A few things to note before we begin: This is for Windows users only. I've never used a Mac/Linux computer, and as such know nothing about them. If you use one of those OS's, you MIGHT be able to follow this, but you'll probably need different directions for things such as navigating to your Creatures 3/Docking Station directory. As well, I'm not sure if the required programs for this tutorial even work on a Mac/Linux.
While I'll try to explain everything in as much detail as possible so that even those without any CAOs knowledge can follow this tutorial, reading AquaShee's CAOs Chaos and Moe's Beginner Tutorial before attempting to follow this tutorial will really help you understand what you're doing here.
You'll also need the following things:
1. The CAOS Tool from Gameware Development (WARNING: Direct Download Link).
2. The SpriteBuilder from Gameware Development. (WARNING: Direct Download Link).
3. Mirality System's REVELATION.
4. If you're using Creatures Exodus, you'll probably need the Remastered Patch to use the CAOS Tool.
And here's how to install them:
1. The CAOS Tool Installer is an .exe file. After it's done downloading, double-click it to install. When prompted, put down "Gameware" for the name and "350-4742K-1234U-WK" for the registration number (code? It's been a while since I've installed the CAOS Tool).
2. The SpriteBuilder is also an .exe file, but unlike the CAOS Tool it's standalone. Just extract it somewhere and run it.
3. REVELATION is a DOS/Console program. Like the SpriteBuilder, you can just extract it anywhere you want (although I STRONGLY suggest you put it in a folder - using it makes a lot of files that will cause issues if you put it on the Desktop). However, you need to do something special in order to use it correctly, which will be covered later in this guide.
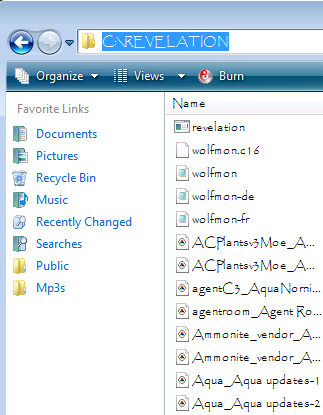
Alright, enough expository banter. Let's get down to the meat, shall we?
For this tutorial, I'll be extracting the Water Weedgrass from Aquatilis Caverna 2, but you'll probably be extracting a different plant/animal from a different metaroom. Your choice won't affect the tutorial at all, however.
The Process
1. Navigate to your C3/DS "My Agents" folder. If you're running a "normal" C3/DS installation (i.e. the free DS Download or from Creatures Trilogy), then your path should look something like mine (highlighted bit):

2. Find the agent file for the metaroom you wish to extract a plant/animal from. Usually, the agent file is named after the metaroom, but sometimes it's named oddly (for example, Aquanornia's agent file is simply called "AgentC3" or "AgentDS." Really descriptive, isn't it?). In that case, you might want to use Notepad to open up all the oddly named agents. Once the file's done loading, it'll say what the agent contains at the top. Either way, once you've found your metaroom, copy its agent file (right-click on it, then select "Copy").
3. Navigate to wherever you put REVELATION, and paste the agent file into that folder (right click on the folder and not on REVELATION itself and select "Paste").

4. Now, to run REVELATION. If you tried to double click on REVELATION itself, you'll find that it simply brought up a window for a split second and disappeared again. The same thing happens if you attempt to drop your agent file onto REVELATION. Neither will get you very far. To run REVELATION properly, you'll need to do this:
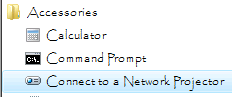 4a. On your main Windows menu, navigate to "Accessories" and click "Command Prompt." Alternatively, you can use the Run function and type "cmd" into the dialog to run the Command Prompt if it's not on your main menu. Just ignore the fact that the wrong thing's highlighted in this picture - the thing you want is right above it.
4b. The default path for the command prompt is "X:/Users/*Your name*". Since you probably didn't put REVELATION there, you'll need to navigate to the correct location. Type in "cd *your path to REVELATION*" and push Enter. This is why I told you to copy down the path to REVELATION's location earlier.


5. If the decompiling was successful, exit out of the Command Prompt (either by pushing the X button or by simply typing "exit" and pushing Enter). Go back to the folder you put REVELATION in.
6. Among all the random files you should have gotten (here's why I told you to give REVELATION its own folder), there should be a .cos file named *agent name*_*Agent Injector/Creator Name*-1. Open that .cos file with the CAOS tool.
6a. There are some agent files (such as anything CL made and the Norngardens) that simply will not produce a .cos file when decompiled with REVELATION. There is a way around this; unfortunately, I've forgotten it. If you're trying to get something out of a CL agent file then you're out of luck unless you use that alternative method, but for anything else you should still be able to get at the code by opening up the .agent file with Notepad. If you were able to install the CAOs Tool, then you can still follow the tutorial with the .agent file opened up in Notepad.
7. The CAOS Tool screen looks something like this:

Using the Find function (either by clicking "Find" in the Edit menu or by clicking the binoculars symbol on the toolbar), you can locate the plant/animal you want to extract. If the .cos file is commented, you may be able to get away with simply typing the name of the plant/animal into the search bar, but if not (or if the file is commented oddly), you'll have to use SpriteBuilder.
7a. Open up SpriteBuilder (wherever you might have placed it). Under the File menu, click "Open."
7b. Navigate to your "Creatures 3/Images" or "Docking Station/Images" folder.
7c. From here, we'll search for the sprite file of the critter/plant we want to extract. Most metaroom creators put the name or acronym of their metaroom before the name of the critter/plant (for example: "ac_shrimp" for the Aquatilis Caverna shrimp).


 9. Open up a new .cos file ("New" under the file menu or the single sheet of paper to the far left of the toolbar), and paste the stuff you copied into it. Check to see how many classifiers are contained within your installation script (seeds and adult plants are always classified differently, and sometimes adult and baby critters are classified differently as well). If there's more than one, then you need to get the scripts for all of them. As an additional note, the AC2 watergrass is an example of an installation routine that has a bunch of stuff other than "reps" or "new: simp" at the start of it - in this case, it'll be irrelevant soon enough, but if your installation routine looks like this one, don't count it off right off the bat.
10. Now it's time to find the event scripts for your chosen plant/critter. You can use the comments again, but this time it's easier to simply search for the agent's classifier. This is the set of 3 numbers to the right of the sprite file's name (which is in quotations). Copy these into the "Find" function and search. What the numbers mean is largely irrelevant to this guide, so don't worry about that too much.

11. Click the "Find Next" button several times to judge how many scripts you need to copy. Note that the event routines are always within "scrp X X X X"/"endm" blocks. Stuff after the "rscr" command will be covered shortly, and just outright ignore the classifier if it shows up anywhere else.
 12. Now, copy all the event scripts ("script X X X X"/"endm" blocks) that contain your chosen plant/critter's classifier into your new .cos file that was created in step 9. Make sure that you don't copy scripts from the agents immediately preceding/proceeding your chosen agent unless their classifiers also showed up in your installation script. Make sure you get ALL of the event scripts - if you miss one, you'll run into an error when it comes time to get your extracted agent into the game.
13. Now for the stuff after the "rscr" command. The "rscr" command is the remove script - that is, it gets rid of the room's agents and their scripts. Now, not all rooms have these (in fact, the room I'm using doesn't), so if it's not there you can skip this step. Otherwise, copy the commands that contain the classifier(s) in your installation script (they always look like "enum X X X/kill targ/next" or "scrx X X X X") into your .cos file. When you're sure you have copied everything, you can close the room's .cos file (but leave yours!). We won't be needing it for the rest of this tutorial.
14. Now, fire up your game. Before you go any further, make sure the game mentioned on the bar at the very top of the CAOs Tool window matches the game that you've chosen to run (it should read "Docking Station" if you're running Docking Station, for example). If they don't match, you won't be able to inject your extracted plant/critter into your game. Go to the spot where you want to place your extracted plant/critter (I'll be using the Norn Meso, which I've flooded).
15. Push "Shift+Ctrl+X" to bring up a pair of numbers next to the hand. These are the coordinates of the hand within the world - the top refers to the X-axis and the bottom refers to the Y-axis. Move the hand to the leftmost position of the area where you want to inject your plant/critter.

16. Copy down those coordinates - you can pause the game with the "Pause/Break" key on your keyboard to freeze the coordinates, or you can simply write them down on an external sheet of paper. Go back to your .cos file.
17. In your installation script, find the command labeled "mvto" or "mvsf." Replace the coordinates immediately after that command with the ones you just copied down. Don't worry if your script says something like "mvsf va00 va01" instead of "mvsf 34021 758" - treat the "vaXX's" like they were actual numbers.

18. In theory, you could inject the script now. However, there's a high probability that you'll get weirdness (such as multiple plants growing in the exact same spot) if you leave the "mvto/mvsf" command like this, so let's randomize the location a little. Go to the rightmost spot of your area and copy down the X-coordinate (not the Y coordinate - you got that in the previous steps) of that spot.
19. Immediately after the "mvto/mvsf" command, type in the command "rand" and put a space between it and whatever your X-coordinate is. Immediately after your X coordinate, type in the X-coordinate you just copied down. Now, the script will randomly choose a location in between the two coordinates you typed in and put a plant/critter there.

20. Now it's time to inject your newly created .cos file into the game. In the CAOs tool window, push the button to the far right that has three lines on it.

21. If you get no errors, then congratulations! You have successfully turned a critter/plant that was originally packaged with a metaroom into a standalone plant/critter! You can save this .cos file if you want to use it more than once; however, do NOT put it in your "Creatures 3/Bootstrap" or "Docking Station/Bootstrap" folder, especially if you injected your plant/critter into a third-party metaroom. Save it to somewhere else (I personally put mine in my EasyPRAY "Projects" folder).

21a. However, if you did get an error, check to see what it said. If it tells you something about an "invalid map position," you need to find different coordinates to inject your plant/critter into - the ones you chose originally couldn't fit the agent!
21b. If you get "tried to set bhvr X, but couldn't find one of the appropriate scripts," then you probably missed a script somewhere. Go back to the room's .cos file, find your plant's/critter's event scripts, and compare them to the ones you copied down.
21c. Finally, you might get a syntax error - if this happens, the affected parts of the .cos file in the CAOs Tool will be red instead of blue. If this happens, something got formatted wrong - make sure each bit of code is on its own line, and make sure that all "scrp X X X X" blocks end with an "endm."
Man, that was a long tutorial. Feel free to tell me if something doesn't make sense or needs elaborating.
Subscribe to:
Posts (Atom)