

A few things to note before we begin: This is for Windows users only. I've never used a Mac/Linux computer, and as such know nothing about them. If you use one of those OS's, you MIGHT be able to follow this, but you'll probably need different directions for things such as navigating to your Creatures 3/Docking Station directory. As well, I'm not sure if the required programs for this tutorial even work on a Mac/Linux.
While I'll try to explain everything in as much detail as possible so that even those without any CAOs knowledge can follow this tutorial, reading AquaShee's CAOs Chaos and Moe's Beginner Tutorial before attempting to follow this tutorial will really help you understand what you're doing here.
You'll also need the following things:
1. The CAOS Tool from Gameware Development (WARNING: Direct Download Link).
2. The SpriteBuilder from Gameware Development. (WARNING: Direct Download Link).
3. Mirality System's REVELATION.
4. If you're using Creatures Exodus, you'll probably need the Remastered Patch to use the CAOS Tool.
And here's how to install them:
1. The CAOS Tool Installer is an .exe file. After it's done downloading, double-click it to install. When prompted, put down "Gameware" for the name and "350-4742K-1234U-WK" for the registration number (code? It's been a while since I've installed the CAOS Tool).
2. The SpriteBuilder is also an .exe file, but unlike the CAOS Tool it's standalone. Just extract it somewhere and run it.
3. REVELATION is a DOS/Console program. Like the SpriteBuilder, you can just extract it anywhere you want (although I STRONGLY suggest you put it in a folder - using it makes a lot of files that will cause issues if you put it on the Desktop). However, you need to do something special in order to use it correctly, which will be covered later in this guide.
Alright, enough expository banter. Let's get down to the meat, shall we?
For this tutorial, I'll be extracting the Water Weedgrass from Aquatilis Caverna 2, but you'll probably be extracting a different plant/animal from a different metaroom. Your choice won't affect the tutorial at all, however.
The Process
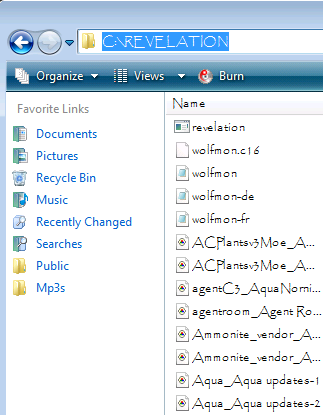
1. Navigate to your C3/DS "My Agents" folder. If you're running a "normal" C3/DS installation (i.e. the free DS Download or from Creatures Trilogy), then your path should look something like mine (highlighted bit):

2. Find the agent file for the metaroom you wish to extract a plant/animal from. Usually, the agent file is named after the metaroom, but sometimes it's named oddly (for example, Aquanornia's agent file is simply called "AgentC3" or "AgentDS." Really descriptive, isn't it?). In that case, you might want to use Notepad to open up all the oddly named agents. Once the file's done loading, it'll say what the agent contains at the top. Either way, once you've found your metaroom, copy its agent file (right-click on it, then select "Copy").
3. Navigate to wherever you put REVELATION, and paste the agent file into that folder (right click on the folder and not on REVELATION itself and select "Paste").

4. Now, to run REVELATION. If you tried to double click on REVELATION itself, you'll find that it simply brought up a window for a split second and disappeared again. The same thing happens if you attempt to drop your agent file onto REVELATION. Neither will get you very far. To run REVELATION properly, you'll need to do this:
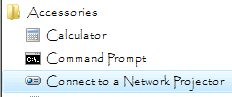 4a. On your main Windows menu, navigate to "Accessories" and click "Command Prompt." Alternatively, you can use the Run function and type "cmd" into the dialog to run the Command Prompt if it's not on your main menu. Just ignore the fact that the wrong thing's highlighted in this picture - the thing you want is right above it.
4b. The default path for the command prompt is "X:/Users/*Your name*". Since you probably didn't put REVELATION there, you'll need to navigate to the correct location. Type in "cd *your path to REVELATION*" and push Enter. This is why I told you to copy down the path to REVELATION's location earlier.


5. If the decompiling was successful, exit out of the Command Prompt (either by pushing the X button or by simply typing "exit" and pushing Enter). Go back to the folder you put REVELATION in.
6. Among all the random files you should have gotten (here's why I told you to give REVELATION its own folder), there should be a .cos file named *agent name*_*Agent Injector/Creator Name*-1. Open that .cos file with the CAOS tool.
6a. There are some agent files (such as anything CL made and the Norngardens) that simply will not produce a .cos file when decompiled with REVELATION. There is a way around this; unfortunately, I've forgotten it. If you're trying to get something out of a CL agent file then you're out of luck unless you use that alternative method, but for anything else you should still be able to get at the code by opening up the .agent file with Notepad. If you were able to install the CAOs Tool, then you can still follow the tutorial with the .agent file opened up in Notepad.
7. The CAOS Tool screen looks something like this:

Using the Find function (either by clicking "Find" in the Edit menu or by clicking the binoculars symbol on the toolbar), you can locate the plant/animal you want to extract. If the .cos file is commented, you may be able to get away with simply typing the name of the plant/animal into the search bar, but if not (or if the file is commented oddly), you'll have to use SpriteBuilder.
7a. Open up SpriteBuilder (wherever you might have placed it). Under the File menu, click "Open."
7b. Navigate to your "Creatures 3/Images" or "Docking Station/Images" folder.
7c. From here, we'll search for the sprite file of the critter/plant we want to extract. Most metaroom creators put the name or acronym of their metaroom before the name of the critter/plant (for example: "ac_shrimp" for the Aquatilis Caverna shrimp).


 9. Open up a new .cos file ("New" under the file menu or the single sheet of paper to the far left of the toolbar), and paste the stuff you copied into it. Check to see how many classifiers are contained within your installation script (seeds and adult plants are always classified differently, and sometimes adult and baby critters are classified differently as well). If there's more than one, then you need to get the scripts for all of them. As an additional note, the AC2 watergrass is an example of an installation routine that has a bunch of stuff other than "reps" or "new: simp" at the start of it - in this case, it'll be irrelevant soon enough, but if your installation routine looks like this one, don't count it off right off the bat.
10. Now it's time to find the event scripts for your chosen plant/critter. You can use the comments again, but this time it's easier to simply search for the agent's classifier. This is the set of 3 numbers to the right of the sprite file's name (which is in quotations). Copy these into the "Find" function and search. What the numbers mean is largely irrelevant to this guide, so don't worry about that too much.

11. Click the "Find Next" button several times to judge how many scripts you need to copy. Note that the event routines are always within "scrp X X X X"/"endm" blocks. Stuff after the "rscr" command will be covered shortly, and just outright ignore the classifier if it shows up anywhere else.
 12. Now, copy all the event scripts ("script X X X X"/"endm" blocks) that contain your chosen plant/critter's classifier into your new .cos file that was created in step 9. Make sure that you don't copy scripts from the agents immediately preceding/proceeding your chosen agent unless their classifiers also showed up in your installation script. Make sure you get ALL of the event scripts - if you miss one, you'll run into an error when it comes time to get your extracted agent into the game.
13. Now for the stuff after the "rscr" command. The "rscr" command is the remove script - that is, it gets rid of the room's agents and their scripts. Now, not all rooms have these (in fact, the room I'm using doesn't), so if it's not there you can skip this step. Otherwise, copy the commands that contain the classifier(s) in your installation script (they always look like "enum X X X/kill targ/next" or "scrx X X X X") into your .cos file. When you're sure you have copied everything, you can close the room's .cos file (but leave yours!). We won't be needing it for the rest of this tutorial.
14. Now, fire up your game. Before you go any further, make sure the game mentioned on the bar at the very top of the CAOs Tool window matches the game that you've chosen to run (it should read "Docking Station" if you're running Docking Station, for example). If they don't match, you won't be able to inject your extracted plant/critter into your game. Go to the spot where you want to place your extracted plant/critter (I'll be using the Norn Meso, which I've flooded).
15. Push "Shift+Ctrl+X" to bring up a pair of numbers next to the hand. These are the coordinates of the hand within the world - the top refers to the X-axis and the bottom refers to the Y-axis. Move the hand to the leftmost position of the area where you want to inject your plant/critter.

16. Copy down those coordinates - you can pause the game with the "Pause/Break" key on your keyboard to freeze the coordinates, or you can simply write them down on an external sheet of paper. Go back to your .cos file.
17. In your installation script, find the command labeled "mvto" or "mvsf." Replace the coordinates immediately after that command with the ones you just copied down. Don't worry if your script says something like "mvsf va00 va01" instead of "mvsf 34021 758" - treat the "vaXX's" like they were actual numbers.

18. In theory, you could inject the script now. However, there's a high probability that you'll get weirdness (such as multiple plants growing in the exact same spot) if you leave the "mvto/mvsf" command like this, so let's randomize the location a little. Go to the rightmost spot of your area and copy down the X-coordinate (not the Y coordinate - you got that in the previous steps) of that spot.
19. Immediately after the "mvto/mvsf" command, type in the command "rand" and put a space between it and whatever your X-coordinate is. Immediately after your X coordinate, type in the X-coordinate you just copied down. Now, the script will randomly choose a location in between the two coordinates you typed in and put a plant/critter there.

20. Now it's time to inject your newly created .cos file into the game. In the CAOs tool window, push the button to the far right that has three lines on it.

21. If you get no errors, then congratulations! You have successfully turned a critter/plant that was originally packaged with a metaroom into a standalone plant/critter! You can save this .cos file if you want to use it more than once; however, do NOT put it in your "Creatures 3/Bootstrap" or "Docking Station/Bootstrap" folder, especially if you injected your plant/critter into a third-party metaroom. Save it to somewhere else (I personally put mine in my EasyPRAY "Projects" folder).
21a. However, if you did get an error, check to see what it said. If it tells you something about an "invalid map position," you need to find different coordinates to inject your plant/critter into - the ones you chose originally couldn't fit the agent!
21b. If you get "tried to set bhvr X, but couldn't find one of the appropriate scripts," then you probably missed a script somewhere. Go back to the room's .cos file, find your plant's/critter's event scripts, and compare them to the ones you copied down.
21c. Finally, you might get a syntax error - if this happens, the affected parts of the .cos file in the CAOs Tool will be red instead of blue. If this happens, something got formatted wrong - make sure each bit of code is on its own line, and make sure that all "scrp X X X X" blocks end with an "endm."
Man, that was a long tutorial. Feel free to tell me if something doesn't make sense or needs elaborating.